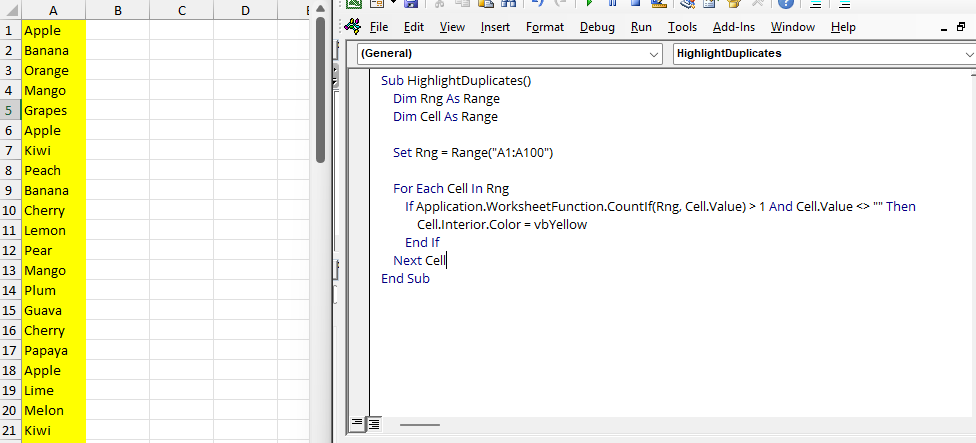
Delete Blank Rows in Excel with a Simple Macro (Step-by-Step Guide)

Excel Macros
Sep 26, 2025 2 min read
Delete Blank Rows in Excel

Messy Excel files with random blank rows are frustrating. I’ve faced them too while working with reports from clients or raw exports from tools. Manually deleting rows one by one is boring and wastes time. That’s where a small VBA macro becomes a lifesaver. In this post, I’ll show you the basic macro, smarter upgrades, and easy adjustments so you can clean up your sheets in seconds.

What You’ll Learn

  • A simple macro to delete blank rows in Excel
  • Smarter upgrades like confirmation pop-ups and selective deletion
  • Adjustments to make the code fit your exact needs
  • Common issues and how to fix them

When to Use It

Use this macro when:

  • You get raw data from external systems that include many empty rows
  • You need to tidy up reports before sharing them
  • You want a repeatable solution instead of manually pressing Delete again and again

Delete Blank rows in Excel with help of simple VBA

Step 1: The Basic Macro

Here’s the simplest version:

Vba
Sub DeleteBlankRows()
    Dim RowNum As Long
    Dim LastRow As Long
    
    LastRow = ActiveSheet.Cells(Rows.Count, 1).End(xlUp).Row
    
    For RowNum = LastRow To 1 Step -1
        If WorksheetFunction.CountA(Rows(RowNum)) = 0 Then
            Rows(RowNum).Delete
        End If
    Next RowNum
End Sub

How It Works

  • Find the last row:
    LastRow checks column A from the bottom and finds the last non-empty cell. That sets the boundary.
  • Loop upward:
    The loop goes from the last row to the first (Step -1). Going bottom-up prevents skipping rows when Excel shifts cells after deletion.
  • Check row contents:
    CountA counts non-empty cells in that row. If it finds nothing (count = 0), the row is considered blank.
  • Delete row:
    The macro deletes the entire row, not just one cell.

In short: Excel scans your sheet → finds empty rows → deletes them cleanly.

Step 2: Making It Smarter

Sometimes the basic version is enough, but often you need more control. Let’s improve it step by step.

a) Work Only in Selected Range

Instead of scanning the entire sheet, you may want to clean only a specific area:

Vba
Sub DeleteBlanksInSelection()
    Dim Cell As Range
    
    For Each Cell In Selection.Rows
        If WorksheetFunction.CountA(Cell) = 0 Then
            Cell.EntireRow.Delete
        End If
    Next Cell
End Sub

Just select the range first, then run the macro. Excel will delete blank rows only within that selection.

b) Add a Confirmation Pop-Up

To avoid accidental deletions, let’s ask the user before running:

Vba
Sub DeleteBlankRowsConfirm()
    Dim RowNum As Long
    Dim LastRow As Long
    
    If MsgBox("Delete all blank rows?", vbYesNo) = vbNo Then Exit Sub
    
    LastRow = ActiveSheet.Cells(Rows.Count, 1).End(xlUp).Row
    
    For RowNum = LastRow To 1 Step -1
        If WorksheetFunction.CountA(Rows(RowNum)) = 0 Then
            Rows(RowNum).Delete
        End If
    Next RowNum
End Sub

Now you’ll see a Yes/No box before the macro deletes anything.

c) Target Only a Specific Column

Sometimes rows look blank but contain formulas or hidden characters. In such cases, you may want to check only one column (say column A):

Vba
Sub DeleteIfColumnABlank()
    Dim RowNum As Long
    Dim LastRow As Long
    
    LastRow = ActiveSheet.Cells(Rows.Count, 1).End(xlUp).Row
    
    For RowNum = LastRow To 1 Step -1
        If Trim(Cells(RowNum, 1).Value) = "" Then
            Rows(RowNum).Delete
        End If
    Next RowNum
End Sub

This looks only at column A. If column A is empty, the row is deleted.

Step 3: Adjustments

Here are some small but useful edits you can make:

Change the target sheet

Replace ActiveSheet with a sheet name:

Vba
Sheets("Data").Cells(Rows.Count, 1).End(xlUp).Row
  • Work with a different column
    Change (Rows.Count, 1) → (Rows.Count, 2) to check column B, (Rows.Count, 3) for column C, and so on.
  • Different confirmation style
    Swap vbYesNo with vbYesNoCancel to allow cancelling.
  • Replace blanks instead of deleting
    Instead of Rows(RowNum).Delete, try:
  • Rows(RowNum).Value = "N/A"

This keeps the structure but fills in a placeholder.

Step 4: Fixing Common Issues

  • Macro won’t run?
    → Make sure macros are enabled in Excel (File > Options > Trust Center).
  • It deleted too many rows!
    → Use the “check only column A” version to be safer.
  • Selection version gave an error
    → Ensure you’ve selected entire rows, not just individual cells.

Wrap-Up

And that’s it! With just a few lines of VBA, you can wipe out messy blank rows in seconds.

We started with the basic macro, made it smarter with conditions and confirmations, and saw easy adjustments for specific needs. Try it out on a test file first, then use it in your daily work.

Comments (0)

Leave a Comment

Comments are moderated before publishing.

No comments yet. Be the first to comment!

Quick Tip

Use Ctrl+T to convert your data range into a formatted table instantly.